-
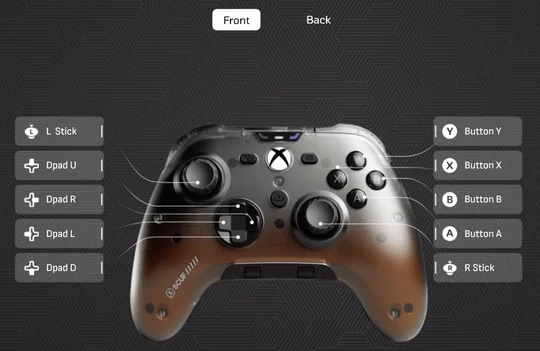
Layout – Front
-
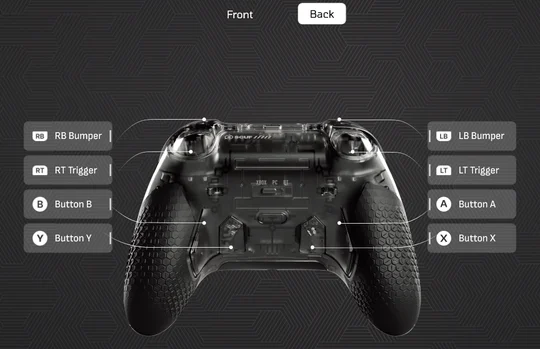
Layout – Back
-
Connecting Your Controller
-
Profiles
-
Remapping
-
Triggers
-
User Customization
-
Audio Control System
-
1K Polling Mode (PC Only - Wired Mode)
-
SCUF Valor Pro Companion App Beta (COMING SOON)
-
Thumbstick & Trigger Calibration
-
Latest Valor Pro Wired Firmware
-
Battery Removal Information
MANUAL | QUICK START GUIDE
Valor Pro
Layout – Front
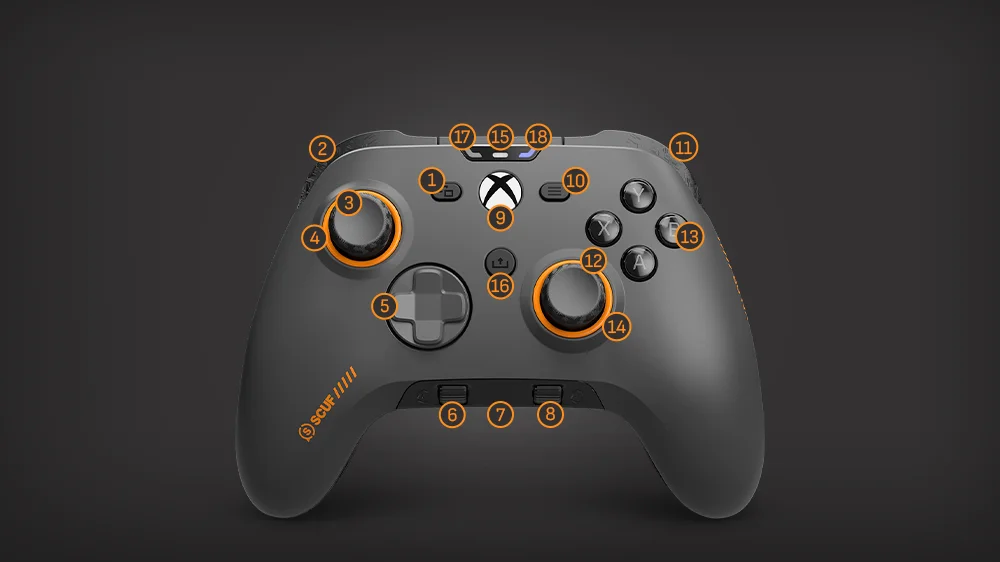
- View Button
- LB (Left Bumper)
- Left Thumbstick
- Anti-friction Ring
- D-pad
- SC1 (In-game Volume Control / Mute Audio)
- 3.5mm AUX Port
- SC2 (Chat Volume Control / Mute Mic)
- Nexus Button
- Menu Button
- RB (Right Bumper)
- Right Thumbstick
- Action Buttons (ABXY)
- Anti-friction Ring
- Status Light
- Share Button
- Audio Status LED
- Profile Status LED
Layout – Back
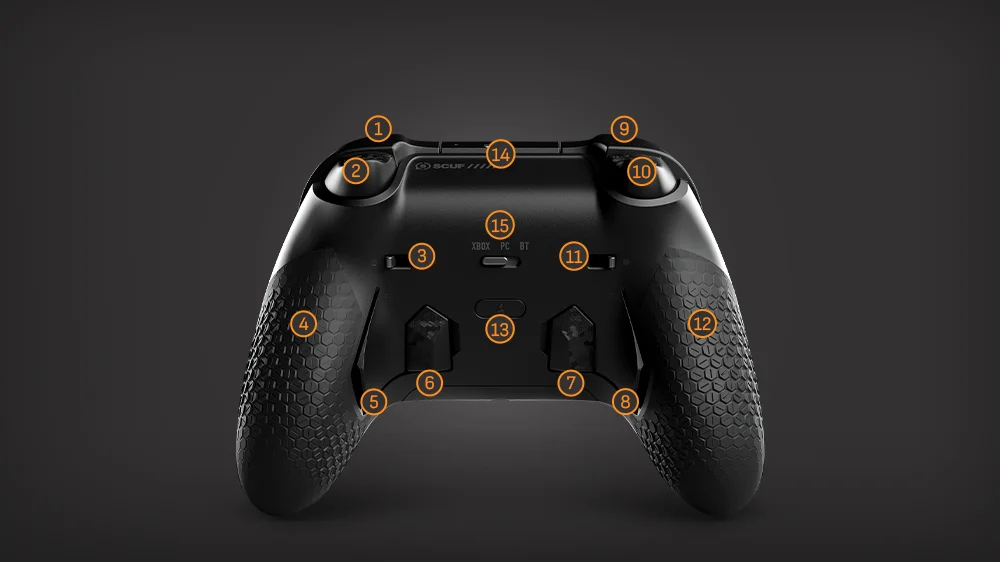
- RB (Right Bumper)
- RT (Right Trigger)
- RT Instant Trigger Toggle
- Grip
- P1 Paddle
- P2 Paddle
- P3 Paddle
- P4 Paddle
- LB (Left Bumper)
- LT (Left Trigger)
- LT Instant Trigger Toggle
- Grip
- Profile Button
- USB-C Port
- Tri-mode Connectivity Switch (Wireless Model Only)
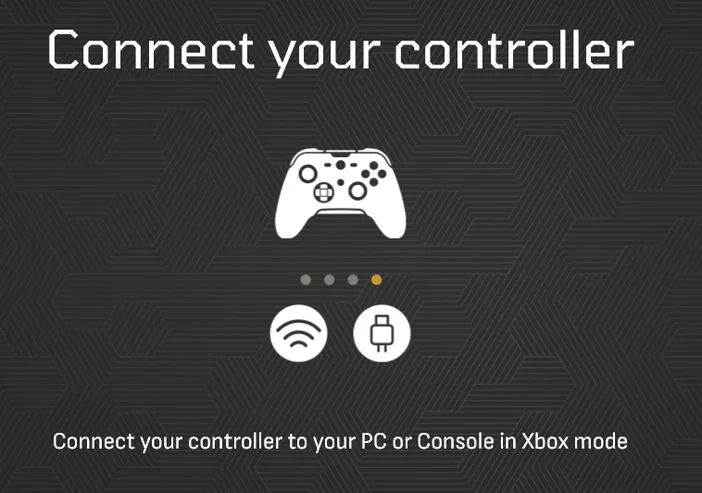
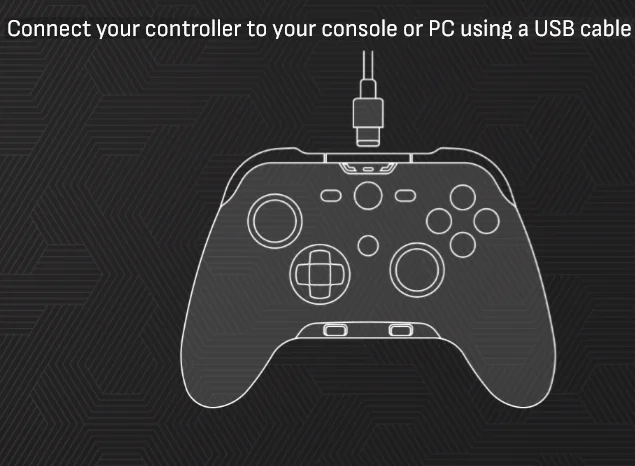
Connecting Your Controller
Instructions for Valor Pro WIRED controllers
To connect your Valor Pro Wired model, please follow these steps:
- To connect to an Xbox Series X|S, Xbox One, or Windows PC, simply connect it to your device using the provided USB-C cable.
- Press and hold the Nexus button until the LEDs turn on. You are now connected for wired play.
Instructions for Valor Pro WIRELESS controllers
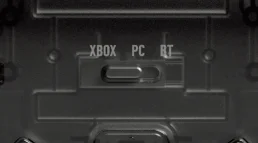
Valor Pro Wireless has 3 modes of connectivity: wired, low-latency wireless, and Bluetooth. See below for how to connect and play with each:
Wired
- To play in wired mode, first ensure that the connection method switch is set to the appropriate platform.
- For Xbox, the switch needs to be in the left position.
- For PC, the switch needs to be in the middle position.
- Next, connect your controller to your device using the provided USB-C cable.
- Finally, press and hold the Nexus button until the LEDs turn on. You are now connected for wired play.
Low-latency Wireless
- To play using the low-latency wireless connection, plug the provided wireless dongle into an Xbox or PC.
- Next, ensure that the connection method is set to the appropriate platform.
- For Xbox, the switch needs to be in the left position.
- For PC, the switch needs to be in the middle position.
- Press and hold the Nexus button until the LEDs turn on. You are now connected for low-latency wireless play.
Bluetooth
To play with your controller using a Bluetooth connection you will need to put your controller into Bluetooth pairing mode to connect to a device.
- First, ensure that the connection method switch is set to Bluetooth mode (right position switch).
- Power on your controller by pressing and holding the Nexus button until the LEDs turn on.
- Next, press and hold both the Nexus button and View button simultaneously for 5 seconds.
- You can let go of the Nexus and View buttons once you the white status LED above the Nexus button start rapidly blinking.
(This will happen after pressing and holding the Nexus button and View button simultaneously for 5 seconds) - Your controller is now in Bluetooth pairing mode.
- Navigate to your devices' Bluetooth settings.
- Locate and select your Valor Pro wireless controller from your devices' Bluetooth directory. You are now connected for wireless play via Bluetooth connection.
Please note that controller will remain in Bluetooth pairing mode for 20 seconds. If a Bluetooth connection is not established within that time, the controller will exit pairing mode and may power off.
Attention: SCUF recommends users to use a wired or low-latency wireless connection when playing on PC. Additionally, SCUF recommends using a Bluetooth connection when using your controller with mobile devices.
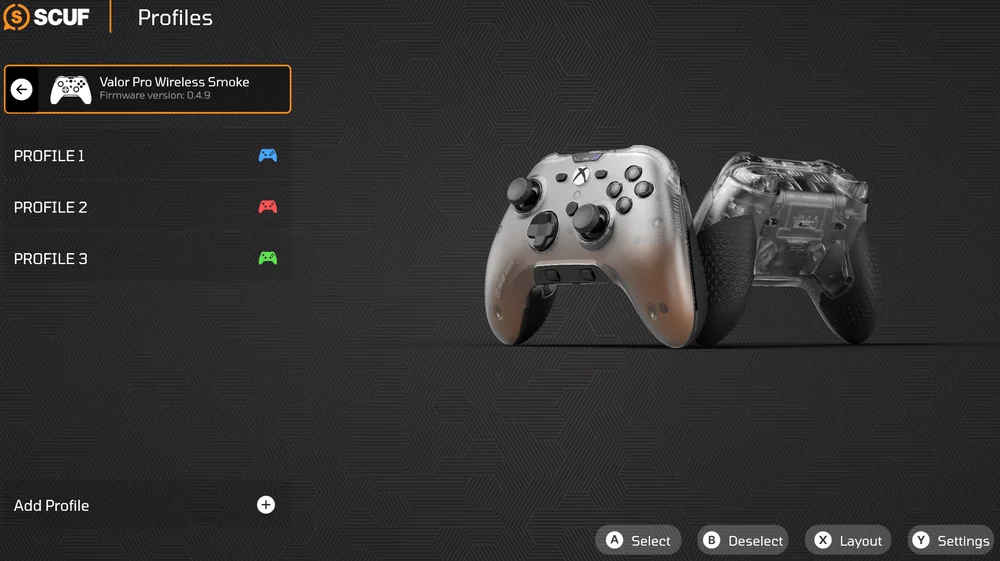
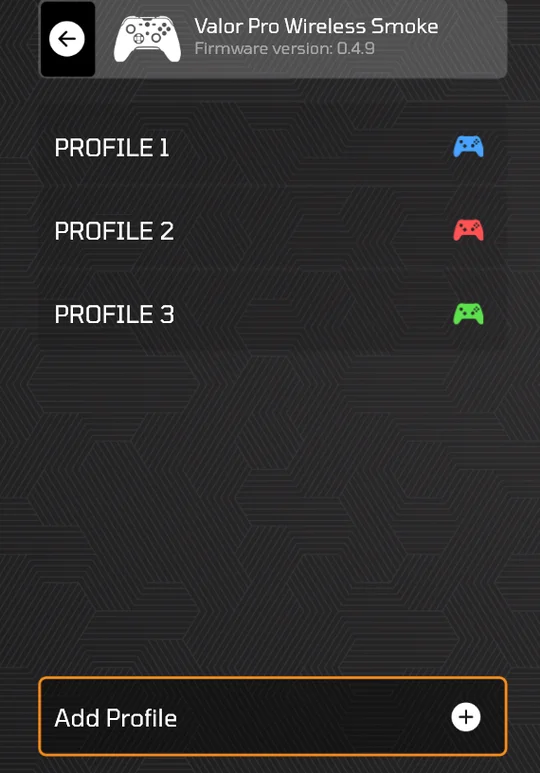
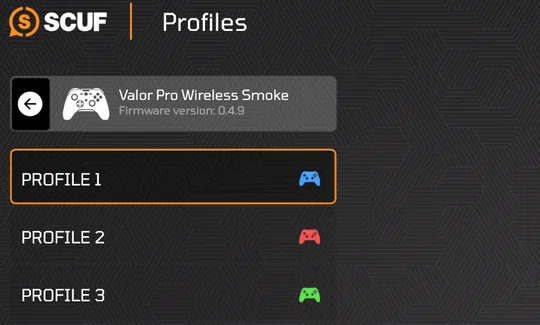
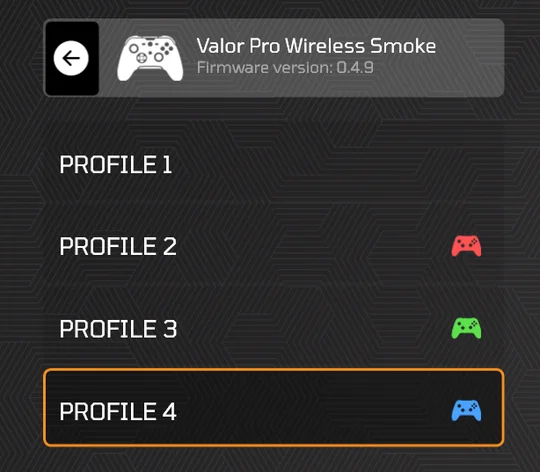
Profiles
Your controller comes with three preset paddle profile configurations to get you started. Simply press the Profile Button on the back of the controller to select the one you want.

Remapping
Remappable paddles allow you to keep your thumbs on the sticks and engage fingers that are usually passive. May take some time to get used to, but it will shorten your response times and provide you with game-changing milliseconds.
- First press the Profile Button until you see the color profile you want to change.
- Next, press the Profile Button again, but continue to hold it until the profiles status LED starts to blink.
- Now you can remap any of the paddles by holding it down and then pressing the button you want to save. After a successful pairing, the Profile Status Light will turn white, and the controller will vibrate.
- Now you can remap any paddle by simultaneously pressing the paddle and the button you would like to remap it to. After a successful pair, the profile status LED will turn white, and the controller will vibrate.
- Please note that if your controller is in PC-only high-speed mode while remapping, the profile status LED will turn yellow instead of white.
- To save your remapped configuration, simply press the Profile Button. The profile status LED will stop blinking.
To reset all profile mappings back factory settings, press and hold both thumbsticks down for 3 seconds while in remapping mode (profile status LED is blinking).
The profile status LED will pulse white 3 times indicating that all profiles have been returned to factory mappings.
Please note that you can remap every function to the paddles except the Xbox home button, scroller wheel clicks, and thumbstick directional movements.
To remove a paddle’s input, simply map the share button to the paddle you don’t want to have a function.
Triggers
Valor Pro is equipped with Instant Triggers, perfect for firing off a quick shot at the speed of a mouse click. Simply flip the switch towards the outside of the controller.
To switch the triggers to full throw mode, simply flip the switch the other way.
Please note: The controller’s impulse triggers will auto-disable when the instant triggers are turned on and auto-turn back on when the instant triggers are turned off.
User Customization
Valor Pro comes with removable parts so that you can customize your controller’s look.
Accessories
Want to swap your thumbsticks? Change your D-Pad? Simply, remove your faceplate by gently pulling it from the top, near the bumpers and pull away.
Now you can access your d-pad, anti-friction rings, and thumbsticks.
Keep your look fresh with a new Faceplate, Thumbsticks and Anti-Friction Rings — there are endless combinations available at scufgaming.com.
Interchangeable Thumbsticks
First things first, what are you playing?
For first person shooters, we recommend using your tall thumbstick on the right for precision and accuracy through the scope. Short concaved on the left to dig in for quick, responsive moves. For sports games, stick with your concave sticks, they’ll give you the right balance.
Want to do your own thing? We get it. Remove your faceplate trim and simply pull the thumbsticks away from the shaft. Slide the new one on just as easily. To remove your Anti-Friction Rings, simply push them out from behind the faceplate trim and reverse the motion to reinstall.
Inner Paddles
Valor Pro also comes with inner paddle blanking plates. You can use these if you don’t want to have inner paddles.
To install the blanking plates, you will need to remove the inner paddles first.
- To remove the inner paddles, find the finger notch located by the sides of the inner paddles.

2. Using your finger, simply pull away until the inner paddle comes off.
3. Once the paddle is off, install the blanking plate.
Audio Control System

Your controller comes with a dedicated on-board Audio Control System in the form of two audio scroll wheels.
To use the Audio Control System, you’ll need to plug a headset into the 3.5mm aux port on the controller.
The scroller on the left controls game volume while the scroller on the right controls your chat volume.
Pressing the scrollers down will mute audio.
If your headset has a microphone, you can mute and unmute it by simply clicking the right scroller.
When your mic is muted, a constant amber light will be shown on the audio status LED while no light indicates nothing is muted.
The left scroller click mutes and unmutes at the system level meaning that all input and output audio will be muted or unmuted. This includes your headset mic regardless of whether it was muted or unmuted prior to pressing the left scroller click.
A blinking amber light will be shown from the audio status LED when you have system level muted while no light indicates nothing is muted.
Please note:
The audio status LED will only show status when utilizing the scroll wheel clicks. Muting / unmuting audio input or output from other sources will not affect the controller’s audio status LEDs.
Additionally, the audio scroll wheels do not affect the Windows volume bar when being used on PC and may not have full support with in-game and external chat programs.
1K Polling Mode (PC Only - Wired Mode)
FOR WIRED MODEL ONLY:
To enter 1K Polling mode, ensure that the controller is plugged into your PC and powered on.
While the controller is powered on, simultaneously press and hold the share, menu, and A buttons.
The controller will automatically turn off and then back on.
To exit 1K Polling mode, simultaneously press and hold the share, menu, and B buttons.
Once again, the controller will automatically turn off and you will need to turn the controller back on again manually.
WARNING: DO NOT USE THIS MODE WHEN PLAYING ON CONSOLE.
Please note that 1K Polling mode only works on PC. Additionally, some games or applications may not support this mode.
FOR WIRELESS MODEL ONLY:
Your controller will automatically be put into 1K Polling mode when being used in wired mode on PC.
To set your controller into wired mode, simply plug in your controller to your PC and ensure that the controller's Tri-mode Connectivity Switch is set to PC mode (middle position).
Please note that the controller must be used in wired mode. Using the controller in Wireless mode will not achieve 1K Polling.
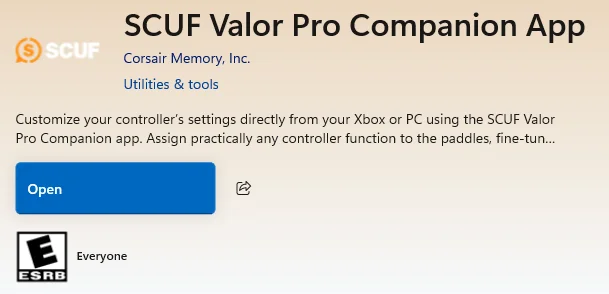
SCUF Valor Pro Companion App Beta (COMING SOON)
Take your Valor Pro's customization even further with the Valor Pro Companion App, available on the Microsoft store for Windows and Xbox. The companion app provides advanced customization features such as the ability to manage and create profiles, configure your controller mappings, and tune your thumbsticks and triggers.
To use the companion app, please download it from the Microsoft Store via a Windows laptop/PC or Xbox console.
Please note: users must use the controller to navigate the app instead of using a mouse when on PC as mouse clicks will not work for navigation and the cursor will not appear within the app window.
Additionally, please keep the app in focus and do not click out of the app or leave the app while in use.
GETTING STARTED WITH THE APP
Before you open the app, ensure that your controller is set to "Xbox" mode (even if you are going to use the app on a PC/laptop).
Next connect your controller to your device via USB cable.
Now that you have your controller set to Xbox mode and connected to your device via USB, open the app.
CONNECTED CONTROLLERS MENU
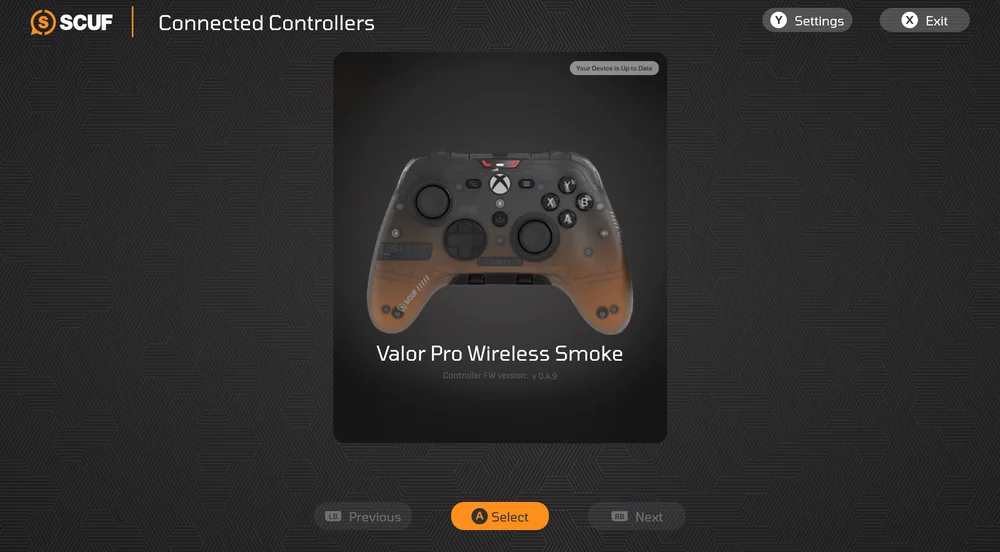
Once you open the app you will be greeted with the "Connected Controllers" menu.
From here you can select the controller you want to configure or bring up the controller's settings.
Press the "Y" button on your controller to bring up the controller's settings.
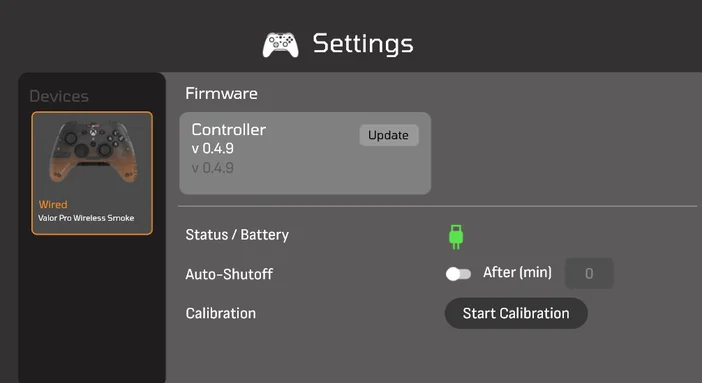
In the Settings menu you can see the controller's charging status, update firmware, perform calibration and adjust the auto-shutoff setting.
To configure your controller, return back to the "Connected Controllers" menu. Select your controller by pressing the "A" button.
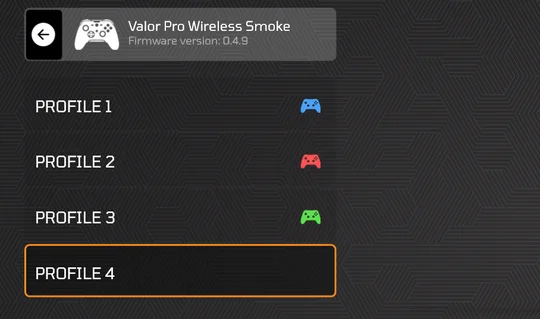
PROFILES MENU
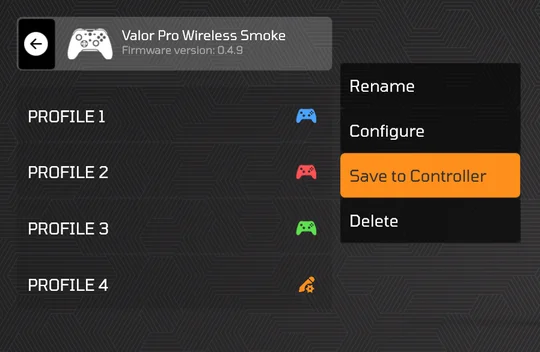
In the Profiles menu you can create, delete, and edit profiles, and save profiles to one of your controller's on-board memory slots (your controller has a total of three on-board memory slots).
To create a profile, simply press the "Add Profile" button.
To configure a profile, simply select the profile you want to configure, and select "Configure."
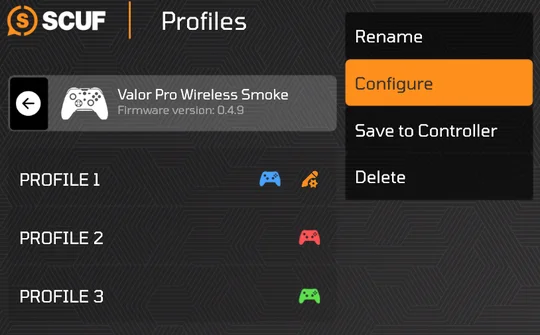
Once you have selected the "Configure" option, you will be brought to the "Configure" menu. Within this menu, you can edit your controller's inputs/mappings, thumbsticks and trigger deadzones/response curves, and vibration settings. Simply use the bumpers to navigate to the the section you want to configure.

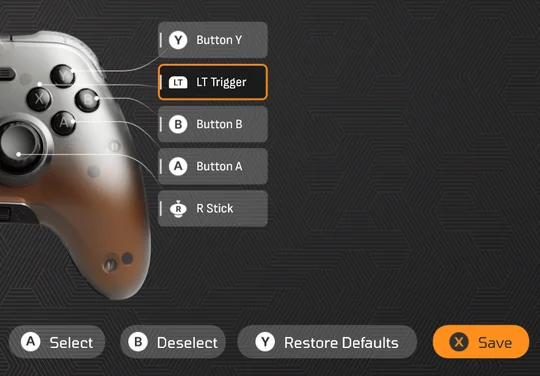
INPUTS / MAPPINGS
To change a mapping on your controller's inputs simply use the front or back layout tabs to find the input you want to change.
Select the input you want to change.
After selecting the input you want edit, a table of mappable functions will be displayed. Select the function you want to assign to you selected input.
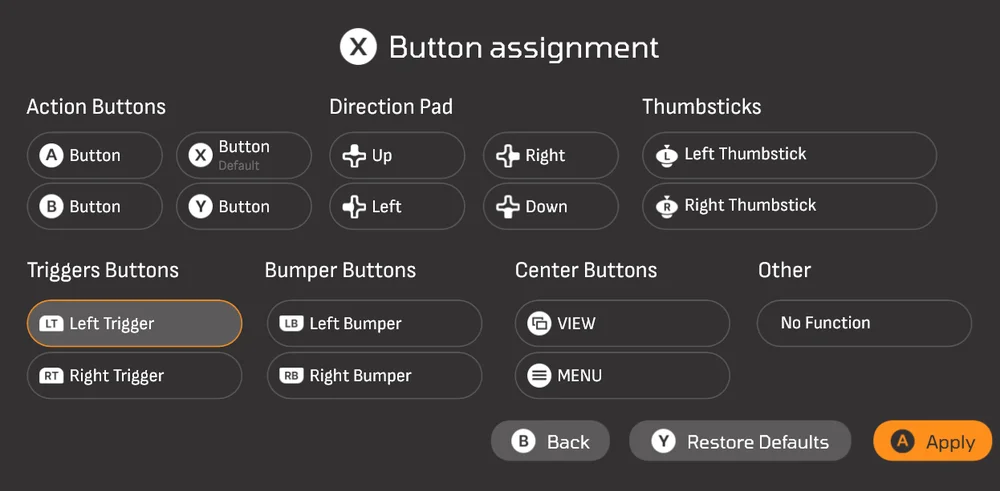
Your updates should now show on the layout of the controller. Don't forget to press the save button when you are done making your changes.
THUMBSTICKS & TRIGGERS
In these sections you can edit deadzones and response curves.
Simply select the thumbstick or trigger that you want edit.
Next, use the D-Pad to move the deadzone slider either left or right.
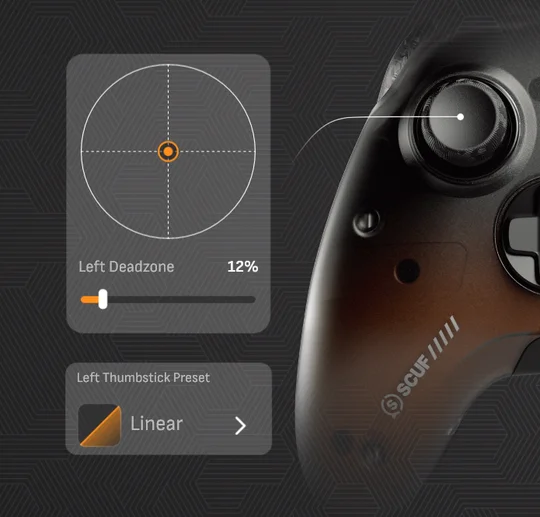
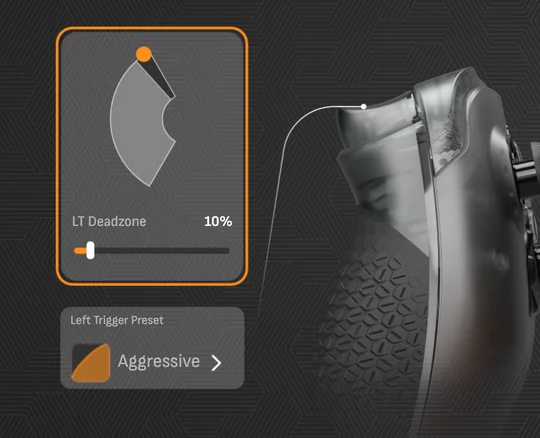
To edit the response curves of the thumbsticks and triggers, select the graph option that is directly under the deadzone feature.
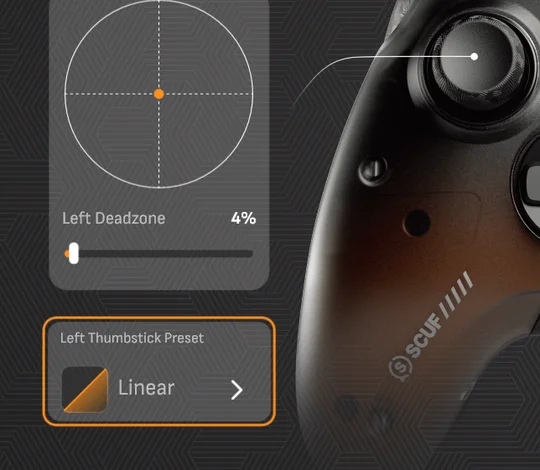

Now you will have a list of the response curve options.

Select the response curve you want to use and then press the save button to lock in your edits to the controller.
VIBRATION
The Vibration section allows you to customize your controller's vibration settings. Simply select one of the sliders to start making adjustments, or you can select one of the sync boxes to allow simultaneous adjustments with the vibration sliders.
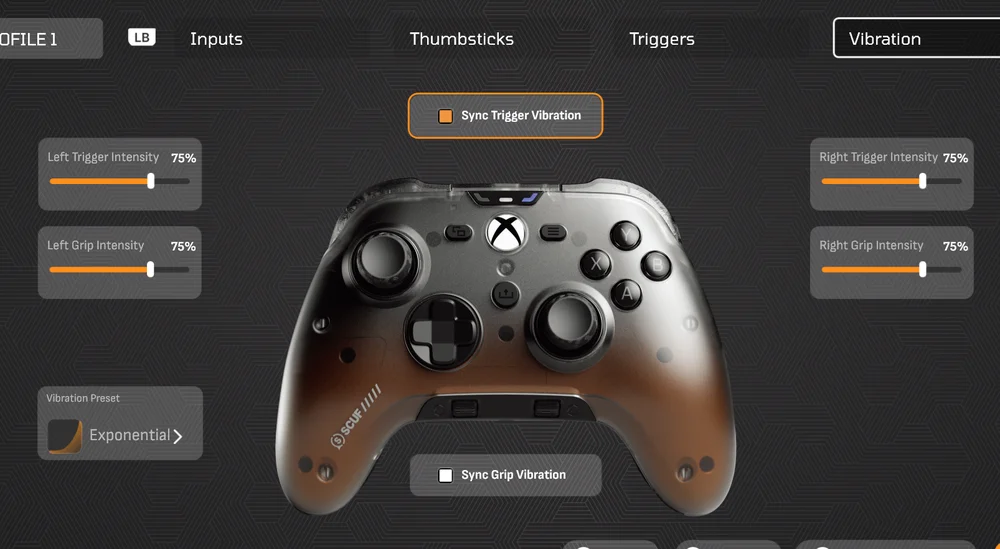
Once you are done making your edits, press the save button.
SAVING A PROFILE TO AN ON-BOARD MEMORY SLOT
To save a profile to one of the three on-board memory slots, select the profile you want to save and then select "Save to Controller."
Next select the profile color you want to assign to the profile.
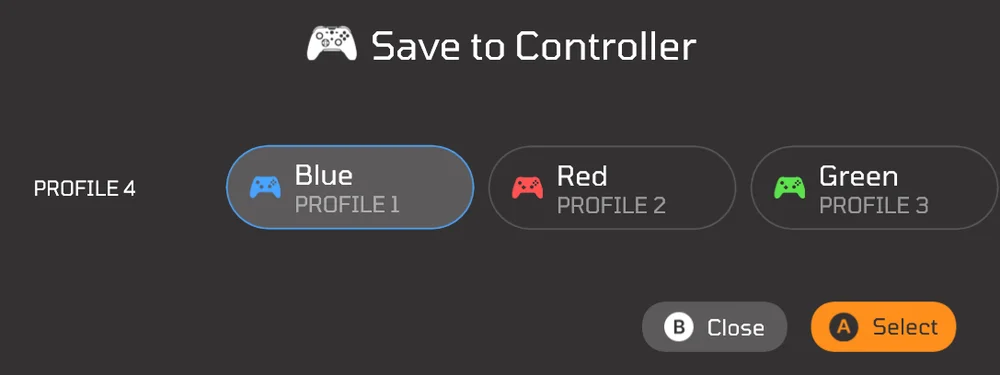
Now you have saved your profile to you controller's on-board memory.
Thumbstick & Trigger Calibration
Your controller comes ready to play out of the box, however you can recalibrate your thumbsticks and triggers should you ever feel the need to.
To recalibrate your thumbsticks and triggers you will need to put the controller into recalibration mode.
To enter recalibration mode, ensure that the controller is unplugged and that the triggers are in full throw mode (instant triggers turned off). Then simply press and hold the menu and view buttons while simultaneously plugging the controller into your console or PC.
Please note that the console or PC needs to be powered on.
- Once the controller is plugged in, and the audio status LED begins to flash red, you can release the menu and view button.
- While the audio status LED is flashing red, push the left and right thumbsticks directly up and let them return to center. Once the thumbsticks have returned to the center press the B button. The audio status LED should now start flashing green.
- While the audio status LED is flashing green, push the left and right thumbsticks directly down and let them return to center. Once the thumbsticks have returned to the center press the B button. The audio status LED should now start flashing blue.
- While the audio status LED is flashing blue, push the left and right thumbsticks directly right and let them return to center. Once the thumbsticks have returned to the center press the B button. The audio status LED should now start flashing orange.
- While the audio status LED is flashing orange, push the left and right thumbsticks directly left and let them return to center. Once the thumbsticks have returned to the center press the B button. Now the profile status LED should start flashing red.
- While the profile status LED is flashing red, fully press down and release the left trigger 3 times. Once the trigger has been pressed down 3 times, press the B button. The profile status LED should now start flashing green.
- While the profile status LED is flashing green, fully press down and release the right trigger 3 times. Once the trigger has been pressed down 3 times, press the B button. The profile status LED should now start flashing blue.
- While the profile status LED is flashing blue, fully rotate both thumbsticks, 360 degrees, clockwise. Once both thumbsticks have been fully rotated clockwise 3 times, press the B button. The profile status LED should now start flashing orange.
- While the profile status LED is flashing orange, fully rotate both thumbsticks, 360 degrees, counterclockwise. Once both thumbsticks have been fully rotated counterclockwise 3 times, press the B button. The profile status LED should now start flashing pink indicating that calibration has been saved.
Please note that the controller will reset. If the controller does not power on automatically, simply press and hold the nexus button until the LEDs turn on.
Please note:
- If you feel you have made an error at any point during the recalibration process, please continue and complete the calibration steps and then re-enter and re-run the recalibration process again.
- You cannot recalibrate the thumbsticks or triggers individually. All steps mentioned prior must be performed when recalibrating the controller.
Latest Valor Pro Wired Firmware
Click here to start the Valor Pro Wired 1K Polling Firmware download.
Please note:
- This firmware is for Valor Pro Wired only.
- By clicking the link the download will start automatically.
- This must be done on your PC (Windows 10/11).
Follow these steps for how to download and install the firmware properly:
- After downloading the file above, right click on the file and click ‘Run as Administrator’.
- Depending on your version of Windows, your computer may not recognize the app. If so, click on ‘More Info’ and then ‘Run anyway’. An additional permission may be required.
- From there, install the firmware to a file location you can easily find after. This should only take a moment and close out when complete.
- It will download a few necessary folders and an application called ‘SCUF_Valor_Updater’. Find this application in your assigned download location and run it. Run a search in your chosen file location if necessary.
- Next, follow the instructions provided on the screen and hold down on the left thumbstick of your Valor Pro while plugging in the USB-C cable. If you do not hold down the thumbstick while plugging in the controller, the application will not recognize it.
- When the installation is completed, you may need to unplug and re-plug in your controller.
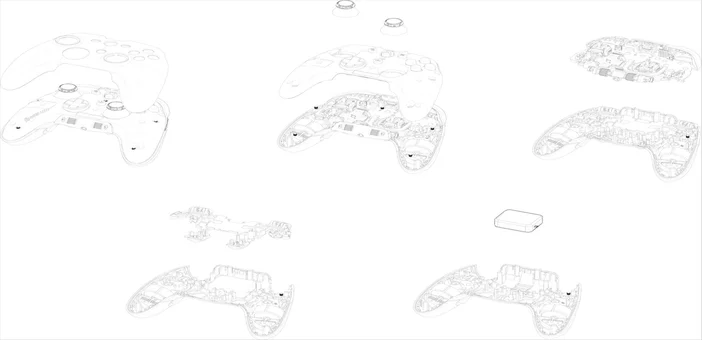
Battery Removal Information
This product uses a rechargeable battery and safety guidelines must be followed in the event that the product is disabled for disposal and recycling. To safely remove the battery for disposal and recycling, follow the numbered steps with the below diagrams.
SCUF Gaming encourages customers to recycle used electronic hardware and rechargeable batteries in accordance with local laws and regulations.
M/N(型號): RGC0004
Rating(電壓電流): 5V ⎓ 1500mA
FCC ID: 2AAFM-RGC0004
IC: 10954A-RGC0004
Dongle Information:
M/N(型號): RGC0007
Rating(電壓電流): 5V ⎓ 0.5A
FCC ID: 2AAFM-RGC0007
IC: 10954A-RGC0007
Battery Information
M/N(型號): 1103039
Rating: 3.7V, 1500mAh, 5.55Wh